
How to Properly Balance Your Pool’s pH Levels
Maintaining the right pH level in your pool is crucial for ensuring the water is safe and comfortable to swim in. The pH scale measures how acidic or basic the water is, on a scale from 0 to 14, with 7 being neutral. Ideal pool water pH is slightly basic, ranging from 7.2 to 7.6. This balance is important not only for swimmer comfort but also for the efficiency of your pool’s chemicals and the longevity of its components. Here’s a comprehensive guide on how to test and adjust your pool’s pH levels effectively.
Step 1: Understanding the Importance of pH Balance
Before diving into the technical process, it’s essential to understand why pH balance is important. Proper pH levels prevent irritation of the eyes and skin, ensure that chlorine works effectively in sanitizing the water, and protect pool equipment from corrosion or scaling.
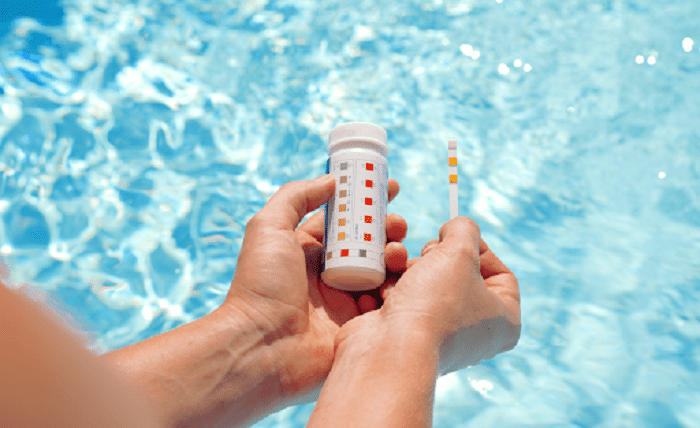
Step 2: Testing the Water
Frequency: Test your pool water at least once a week. During heavy use or extreme weather conditions, increase the frequency to maintain optimal balance.
Methods: Use a reliable testing kit—either test strips, a liquid test kit, or a digital tester. Each method has its pros and cons, but all should give you a clear reading of your pool’s pH level.
Procedure: Follow the instructions specific to your testing kit. For test strips, dip the strip into the water and compare the resulting color to the chart provided. For liquid kits, fill the tester with pool water, add the recommended drops of testing solution, and compare the color of the water to the provided guide.
Step 3: Adjusting the pH Level
If your test shows that the pH level is outside the ideal range, you’ll need to adjust it using either a pH increaser (base) or a pH decreaser (acid).
- To Lower pH: If the pH is above 7.6, use a pH decreaser, such as muriatic acid or sodium bisulfate. Follow the product’s instructions carefully for the correct dosage, based on your pool’s volume and the current pH level.
- To Raise pH: If the pH is below 7.2, use a pH increaser, such as soda ash (sodium carbonate). Again, consult the product’s instructions for the appropriate amount to add, considering your pool’s size and the existing pH.
Step 4: Adding Chemicals
When adding chemicals, always distribute them evenly over the surface of the pool while the pump is running to ensure they’re properly mixed. For safety, add chemicals to water, not water to chemicals, to prevent splashing or reactions.
Step 5: Re-Testing and Adjusting
After adjusting the pH, allow the water to circulate for at least 4 hours, then re-test. This ensures that the chemicals have fully dispersed and gives you a more accurate reading. If the pH is still not within the ideal range, adjust it again as necessary, following the same procedure.
Step 6: Regular Maintenance
Keeping your pool’s pH level balanced is an ongoing task. Regular testing and adjusting, as part of your pool maintenance routine, will help prevent algae growth, protect pool equipment, and ensure the water is safe and comfortable for everyone.
Additional Tips
- Always store pool chemicals in a cool, dry place away from direct sunlight and out of reach of children and pets.
- Never mix different chemicals together, as this can cause dangerous reactions.
- Keep records of your pool’s chemical levels to help track its needs and predict when adjustments might be necessary.
Balancing your pool’s pH is a straightforward process that plays a critical role in pool maintenance. By following these steps and maintaining regular care, you can ensure a safe, clean, and enjoyable swimming environment all season long.