How to Use AI Motion Brush to Animate Any Image Into a Video
The distance between a static photograph and a captivating video used to be measured in hours of manual work, expensive software licenses, and a steep learning curve. Today, AI motion brush video technology has collapsed that distance to a matter of minutes. By letting creators paint motion directly onto specific elements of an image, this approach gives anyone — from social media creators to professional filmmakers — granular control over how a scene comes alive.
The demand for dynamic visual content has never been higher. Audiences scroll past static images but pause for movement. Brands need video at scale. Storytellers want to animate their concepts without hiring an entire production team. AI motion brush tools answer all of these needs by turning the animation process into something intuitive: you select what moves, you draw where it goes, and the AI handles the rest.
This guide breaks down exactly how AI motion brush video works, what makes it different from other animation approaches, and how to use it effectively — whether you are animating a single object or orchestrating a complex multi-element scene.
What Is an AI Motion Brush and How Does It Work?
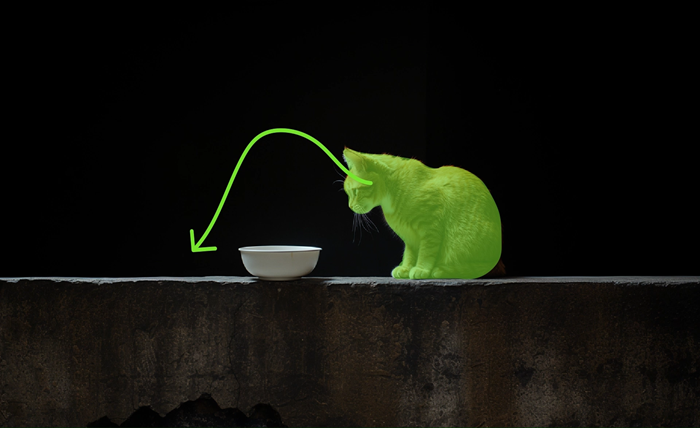
An AI motion brush video tool lets you select specific regions or elements within a static image and assign them a movement trajectory. Instead of animating an entire scene uniformly — the way a simple zoom or pan would — a motion brush gives you element-level control. You decide which parts of the image move, in which direction, and how far.
The underlying process combines computer vision with generative video models. When you brush over an element and draw a motion path, the AI interprets that path as a physical instruction: move this object from point A to point B while maintaining visual coherence with the surrounding scene. The model fills in the frames between the starting position and the endpoint, synthesizing realistic motion that respects the object’s shape, texture, and relationship to other elements.
This is fundamentally different from traditional video editing, where motion is either captured on camera or painstakingly keyframed by hand. With an AI motion brush video workflow, there is no camera required and no frame-by-frame editing. The AI generates the motion from a single image, making it accessible to creators who have never touched animation software.
The result is a short video clip — typically a few seconds — where the selected elements move naturally while the rest of the scene remains stable or follows its own defined path. It bridges the gap between still photography and dynamic video without requiring any technical background.
Key Features That Make AI Motion Brush Video Tools Stand Out
Not all AI video tools offer the same level of control. What distinguishes a dedicated AI motion brush video platform from a general-purpose generator is the precision it gives you over individual elements. Rather than describing motion in a text prompt and hoping the AI interprets it correctly, you draw the motion yourself. That shift from description to direct instruction changes the quality and predictability of results significantly.
Precise Trajectory Control
The core of any motion brush tool is trajectory drawing. You place a path on the canvas — a curve, a straight line, a loop — and the AI follows it. The direction of the path determines where the element travels, while the length of the path influences the speed and distance of movement. A short path produces subtle motion; a longer one creates more dramatic displacement. This level of specificity means you can animate a bird flying in a precise arc, a leaf drifting in a particular direction, or a person’s hand reaching toward a specific point in the frame.
Multi-Element Animation
One of the more powerful capabilities in advanced AI motion brush video tools is the ability to animate multiple elements independently within the same image. Rather than being limited to a single moving object, you can assign separate motion paths to several elements simultaneously — up to six in some platforms. This opens up complex scene compositions: a character walking while a flag waves in the background, or water flowing while birds take flight overhead. Each element follows its own trajectory, and the AI synthesizes a coherent video where all the motions coexist naturally without visual artifacts or conflicts between the moving parts.
Static Brush for Background Stability
A companion feature to the motion brush is the static brush, which lets you designate areas of the image that should remain completely still. This is particularly useful when you want to prevent the AI from introducing unwanted camera drift or background movement. By painting over the background or any element you want frozen, you give the model a clear instruction: this area does not move. The result is a cleaner, more professional-looking video where the contrast between moving and static elements feels intentional rather than accidental.
Step-by-Step Guide to Creating AI Motion Brush Videos
Getting from a static image to a finished AI motion brush video follows a consistent workflow. Here is how the process typically unfolds.
Start with a clear, high-quality image. The AI works best when the elements you want to animate are visually distinct and well-defined. A cluttered or low-resolution image makes it harder for the model to isolate and move specific parts cleanly. Choose an image where the subject you want to animate has clear edges and strong contrast against its background.
Upload the image and enter the motion brush interface. Once your image is loaded, you will see the canvas alongside the brush tools. Most platforms offer two selection methods: automatic detection, which uses AI to identify distinct objects, and manual brushing, which lets you paint over the area you want to animate by hand. For complex subjects or when automatic detection misses the mark, manual brushing gives you more precise control.
Draw your motion trajectory. After selecting an element, draw the path you want it to follow. Think about the physics of the motion — a falling object should arc downward, a walking figure should move forward. The more natural the path, the more convincing the result. Avoid overly long or erratic paths on your first attempt; shorter, cleaner trajectories tend to produce better initial results.
Write a supporting text prompt. Many AI motion brush video tools allow you to add a text description alongside the visual instruction. Use this to reinforce the motion you have drawn — for example, “puppy running along a road” paired with a forward-moving trajectory on the dog. The prompt and the path work together, so keeping them consistent improves output quality.
Generate and review. Submit the generation and evaluate the result. It is common to need several iterations before the motion looks exactly right. Adjust the trajectory length, refine your element selection, or tweak the prompt between attempts. Most creators find that three to six generations are enough to arrive at a polished clip. Once you are satisfied with the motion, use any available upscaling options to improve resolution before downloading the final video.
Best Practices for Getting the Most Out of AI Motion Brush Video
The difference between a mediocre result and a compelling one often comes down to a few technique adjustments rather than the tool itself.
Select only the key part of an element, not the whole thing. When animating a person, brushing over just the torso or head rather than the entire body often produces more precise, natural-looking movement. The AI has less area to synthesize and can focus its generation on the most visually important part of the motion.
Keep each motion brush to a single connected area. Fragmented selections — where you brush over disconnected parts of an element — tend to produce inconsistent results. If you need to animate something with multiple parts, treat it as one continuous region whenever possible.
Match your text prompt to your drawn trajectory. If your path shows upward movement, your prompt should describe upward motion. Contradictions between the visual instruction and the text description confuse the model and reduce output quality.
Use the static brush generously. Locking down the background and any elements you do not want to move gives the AI clearer constraints to work within. The more precisely you define what should and should not move, the more predictable the output becomes.
Iterate with small adjustments. Rather than making large changes between generations, adjust one variable at a time — the path length, the selection area, or the prompt. This makes it easier to identify what is working and what needs refinement.
Who Benefits Most From AI Motion Brush Video Technology?
AI motion brush video tools serve a wide range of creators, but certain use cases stand out as particularly well-suited to the technology.
Social media content creators benefit from the ability to turn product photos, illustrations, or portraits into short animated clips without any video production infrastructure. A single image can become a scroll-stopping post in minutes.
Digital marketers and brand teams can produce dynamic visual assets at scale. Instead of commissioning video shoots for every campaign, they can animate existing photography to create motion content for ads, landing pages, and social channels.
Independent filmmakers and animators use motion brush tools to prototype scenes, animate concept art, or add motion to storyboard frames. Kling AI has become a go-to platform for creators who need professional-grade motion control without the overhead of traditional production pipelines, offering precise trajectory tools alongside a full suite of generative video features.
Educators and presenters can bring diagrams, illustrations, and historical photographs to life, making complex or abstract content more engaging and memorable for their audiences.
Bringing Motion to Life: The AI Advantage
AI motion brush video technology represents a genuine shift in how creators approach animation. What once required specialized skills, expensive software, and significant time investment can now be accomplished by anyone with a clear image and a sense of how they want it to move. The ability to paint motion directly onto specific elements — controlling trajectory, speed, and the behavior of multiple objects simultaneously — puts a level of creative precision in the hands of creators that simply did not exist a few years ago.
The key to getting the most out of these tools is understanding that they reward intentionality. Clear element selection, well-matched text prompts, and thoughtful trajectory design consistently produce better results than vague instructions or overly complex setups. Start simple, iterate deliberately, and use the static brush to anchor what should stay still.
Whether you are a content creator looking to stand out on social media, a marketer building dynamic assets, or a filmmaker exploring new production methods, AI motion brush video opens a creative lane that is both accessible and powerful. The best time to start experimenting with it is now.