
Laminate Flooring Installation: A Comprehensive Guide
Introduction to Laminate Flooring Installation
So, you’re thinking about installing laminate flooring? Great choice! Laminate flooring has become a popular option for many homeowners due to its durability, aesthetic appeal, and cost-effectiveness. But before you dive into this project, it’s essential to understand the ins and outs of laminate flooring installation. For more detailed information on the costs involved, you can visit this guide https://www.homebuddy.com/pages/how-much-does-it-cost-to-install-laminate-flooring/. Let’s walk through this step-by-step guide together.
What is Laminate Flooring?
Laminate flooring is a multi-layer synthetic product fused together with a lamination process. It simulates wood (or sometimes stone) with a photographic applique layer under a clear protective layer. The inner core layer is usually composed of melamine resin and fiberboard materials.
Why Choose Laminate Flooring?
Laminate flooring is an excellent choice for several reasons. It’s durable, easy to clean, and comes in a wide variety of styles and colors that can mimic the look of more expensive flooring options like hardwood or stone. Plus, it’s relatively easy to install, making it a popular DIY project.
Preparation for Installation
Before you start laying down those planks, you need to prepare. Proper preparation can make the installation process smoother and ensure a professional-looking finish.
Tools and Materials Needed
You’ll need a few tools and materials for the job:
- Tape measure
- Utility knife
- Laminate flooring cutter or saw
- Spacers
- Underlayment
- Adhesive (if necessary)
- Safety gear (gloves, goggles)
Measuring Your Space
Start by measuring the length and width of the room to calculate the square footage. Add an extra 10% to your measurements to account for waste and cuts. Accurate measurements ensure you purchase the right amount of flooring and avoid delays.
Acclimating the Laminate Flooring
Laminate flooring needs to acclimate to the room’s environment to prevent expansion or contraction after installation. Leave the unopened boxes of laminate in the room for at least 48 hours before installation.
Subfloor Preparation
A well-prepared subfloor is crucial for a smooth and durable laminate floor installation.
Cleaning the Subfloor
Ensure the subfloor is clean, dry, and free of debris. Any dirt or moisture can affect the installation and longevity of the laminate.
Leveling the Subfloor
Check for any uneven spots. The subfloor should be level within 3/16 inch over a 10-foot span. Use a leveling compound to fix any low areas.
Installing Underlayment
Underlayment provides a smooth surface for the laminate and acts as a moisture barrier. Roll out the underlayment, ensuring it covers the entire floor area. Tape the seams together if necessary.
Planning Your Layout
A good layout plan helps avoid last-minute adjustments and ensures a professional finish.
Determining the Direction of Planks
Typically, planks should run parallel to the longest wall in the room. This layout can make the room appear larger and more cohesive.
Creating a Layout Plan
Sketch out a layout plan. Consider how the planks will meet doorways, transitions, and other obstacles. A detailed plan can save you time and frustration during installation.
Marking Guidelines
Use a chalk line to mark guidelines on the subfloor. These lines will help you keep the planks straight and aligned.
Cutting and Fitting Planks
Cutting laminate planks might seem daunting, but with the right tools and techniques, it’s quite manageable.
Tools for Cutting Laminate
A laminate flooring cutter is ideal for quick and precise cuts. If you don’t have one, a circular saw, jigsaw, or miter saw can also do the job.
Measuring and Marking Planks
Measure and mark the planks carefully before cutting. Remember to account for expansion gaps along the walls.
Cutting Techniques
Cut the planks with the finished side up to reduce chipping. For intricate cuts around obstacles, use a jigsaw.
Starting the Installation
Now comes the exciting part—laying down the planks!
Starting with the First Row
Begin in a corner with the groove side facing the wall. Use spacers to maintain a 1/4 inch expansion gap along the walls.
Spacing and Expansion Gaps
Laminate flooring needs space to expand and contract with temperature changes. Maintain a 1/4 inch gap around the perimeter of the room.
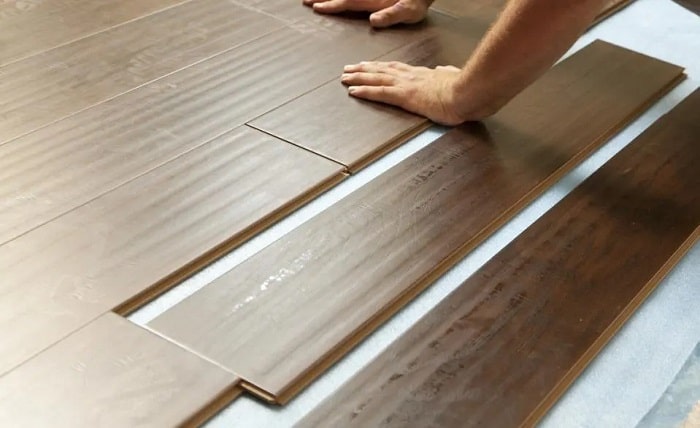
Joining Planks
Connect the planks using the tongue and groove system. Angle the plank slightly, insert the tongue into the groove, and press down to lock it in place.
Continuing the Installation
Keep the momentum going by following these guidelines.
Staggering Seams
Stagger the seams by at least 12 inches to create a more stable floor and a more natural look. This also helps distribute weight and wear evenly.
Handling Doorways and Obstacles
Cut planks to fit around doorways and other obstacles. Use transition strips between rooms and where the laminate meets other flooring types.
Transition Strips and Moldings
Install transition strips and moldings for a polished finish. These pieces cover expansion gaps and give the floor a professional look.
Finishing Touches
The final steps are all about perfecting your new floor.
Installing Baseboards and Trim
Reinstall or replace baseboards and trim. These pieces hide the expansion gaps and give your floor a finished appearance.
Final Inspections
Inspect the entire floor for any gaps, loose planks, or imperfections. Make any necessary adjustments to ensure everything is secure and aligned.
Cleaning and Maintenance
Clean the floor with a damp mop and laminate-specific cleaner. Regular maintenance will keep your floor looking great for years.
Common Mistakes to Avoid
Avoid these pitfalls to ensure a successful installation.
Overlooking Acclimation
Skipping the acclimation process can lead to gaps or buckling. Always let the planks adjust to the room’s temperature and humidity.
Ignoring Expansion Gaps
Without proper expansion gaps, the floor can buckle as it expands. Always leave a 1/4 inch gap around the room’s perimeter.
Inadequate Subfloor Preparation
An unclean or uneven subfloor can cause the laminate to wear prematurely. Ensure the subfloor is clean, dry, and level.
Benefits of Laminate Flooring
Laminate flooring offers numerous advantages that make it a popular choice.
Durability and Longevity
Laminate is highly durable and resistant to scratches, dents, and fading, making it ideal for high-traffic areas.
Easy Maintenance
Laminate floors are easy to clean and maintain. Regular sweeping and occasional mopping keep them looking new.
Cost-Effectiveness
Compared to hardwood or stone, laminate flooring is more affordable while still offering a stylish appearance.
Comparing Laminate with Other Flooring Options
Laminate flooring holds its own against other popular flooring choices.
Laminate vs. Hardwood
Laminate is more affordable and easier to install than hardwood. However, hardwood can be refinished and has a longer lifespan.
Laminate vs. Vinyl
Both are durable and easy to maintain, but laminate offers a more realistic wood appearance. Vinyl is more water-resistant, making it suitable for bathrooms and kitchens.
Laminate vs. Carpet
Laminate is easier to clean and more durable than carpet. Carpet, however, offers a softer feel underfoot and better sound insulation.
Environmental Impact of Laminate Flooring
Consider the environmental aspects of laminate flooring.
Sustainability
Many laminate flooring options are made from recycled materials, making them a sustainable choice.
Recyclability
Laminate flooring can be recycled at the end of its life, reducing environmental impact.
Eco-Friendly Options
Look for laminate products with eco-friendly certifications, indicating they meet environmental standards.
Troubleshooting and Repairs
Occasionally, you might need to fix or replace parts of your laminate floor.
Fixing Scratches and Chips
Minor scratches and chips can be repaired with a laminate floor repair kit, which includes colored putty and wax.
Replacing Damaged Planks
If a plank is severely damaged, it can be replaced. Carefully remove the damaged plank and click a new one into place.
Addressing Moisture Issues
Laminate isn’t as moisture-resistant as vinyl. Address any water spills promptly to prevent damage.
Laminate Flooring Trends
Stay updated with the latest in laminate flooring.
Popular Styles and Colors
Trendy styles include distressed wood, wide planks, and high-contrast colors. Gray tones and natural wood looks are particularly popular.
Innovative Designs
Modern laminate designs mimic the texture and grain of real wood, offering a more authentic look.
Future Predictions
Expect to see more eco-friendly options and advancements in water-resistant technologies in the future.
Conclusion
Installing laminate flooring is a rewarding project that can transform the look of your home. With careful preparation and attention to detail, you can achieve professional results. Enjoy your beautiful new floor and the many benefits it brings!
FAQs
How long does laminate flooring last? Laminate flooring can last between 15-25 years, depending on the quality and care.
Can laminate flooring be installed over existing floors? Yes, laminate can be installed over most existing floors, provided they are clean, dry, and level.
Is laminate flooring suitable for bathrooms? While not as water-resistant as vinyl, some laminate options are designed for areas with higher humidity. Always check the manufacturer’s recommendations.
How do I clean and maintain laminate flooring? Regular sweeping or vacuuming and damp mopping with a laminate-specific cleaner will keep your floor looking great.
What is the cost of installing laminate flooring? The cost varies depending on the quality of the laminate and the size of the area but typically ranges from $3 to $8 per square foot, including installation.